
How to fix blurry vr lens usually comes down to a few practical culprits: dirty optics, fogging, wrong fit, or the headset not matching your eyes (IPD and focus alignment).
Blurry VR is extra frustrating because it feels like something is “broken,” when many times it’s a setup or maintenance issue you can solve in minutes. And if it’s not, you’ll want to know that early so you stop wasting time tweaking the wrong thing.
This guide walks through the real-world checks people skip, a quick self-test, and a set of fixes that work across common headsets, plus when it’s time to contact support.
Quick diagnosis: what “blurry” actually looks like
Before you start “fixing,” name the blur. It points to the right solution fast.
- Smudgy blur across most of the view: oils, streaks, residue on the lenses, sometimes the protective film still on.
- Hazy, milky blur that changes over time: fogging from heat and humidity, or moisture trapped near the lens.
- Sharp center, blurry edges: often normal lens behavior, but can get worse with wrong headset position or IPD mismatch.
- One eye sharper than the other: IPD off, headset sitting crooked, or one lens has a scratch/defect.
- Text always hard to read: IPD/fit, render resolution, or you’re outside the “sweet spot.”
If you only notice blur in one app or game, the headset might be fine and the issue is app resolution or performance settings.
The most common causes (and why they happen)
Most headsets have a small optical “sweet spot,” and real people don’t have perfectly centered eyes, perfectly clean lenses, or perfectly stable environments. That’s why blur shows up.
1) Lens contamination: oils, cleaner residue, or micro-scratches
Eyebrow oils and skin oils spread into a thin film that looks like “permanent haze.” Paper towels and shirt sleeves can add micro-scratches that scatter light and reduce contrast.
2) Fogging from temperature swing
Cold lens + warm face = condensation, sometimes mild enough that you think the panel is low resolution. According to OSHA, humidity and condensation are common contributors to fogging on eyewear in workplaces, and the same physics applies to headset optics.
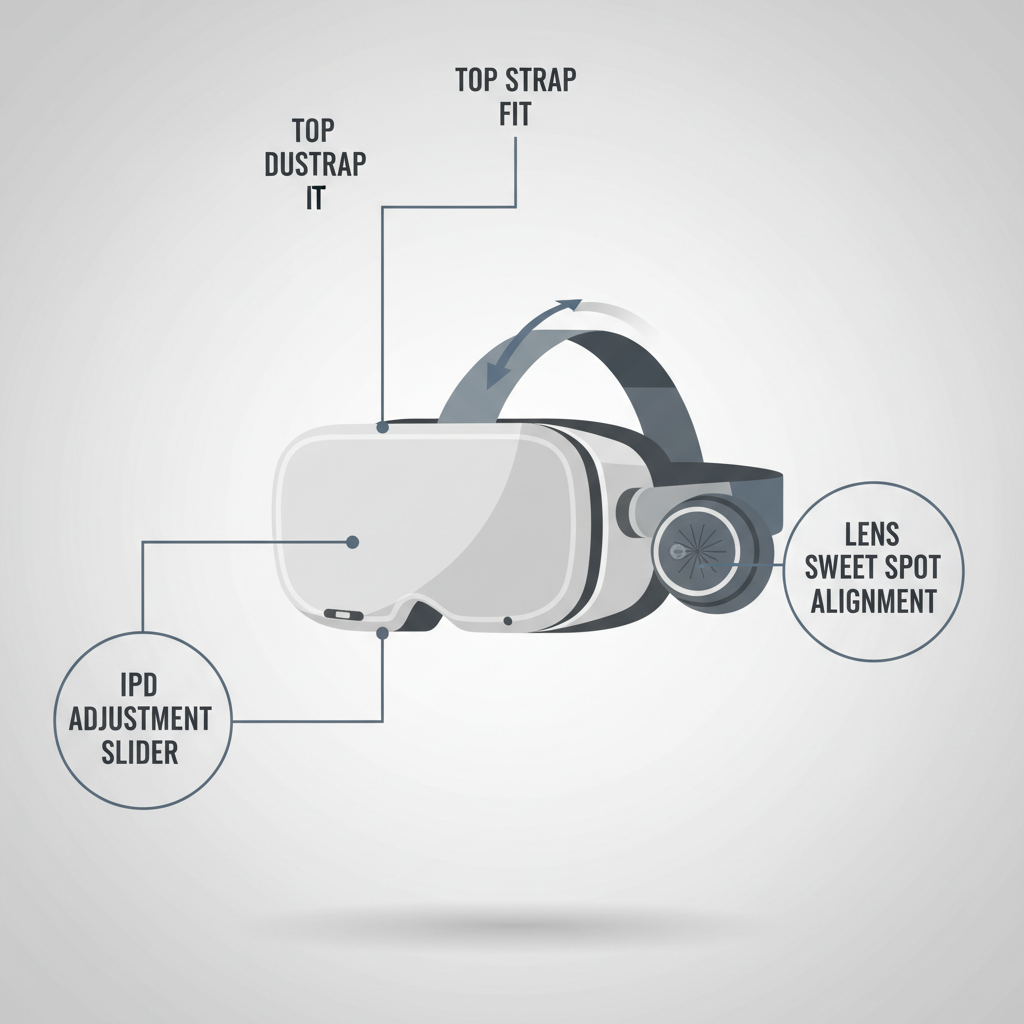
3) Poor fit and eye relief (distance to lens)
If the headset rides too high/low or too far from your eyes, you drift off the sweet spot and everything looks soft. Glasses spacers, thicker facial interfaces, and loose top straps can all push you out of alignment.
4) IPD mismatch (interpupillary distance)
IPD is the distance between your pupils. When it’s off, your eyes look through the “wrong” part of the lenses, causing blur, eye strain, or one-eye clarity issues.
5) Rendering and performance limits
On PC VR, a low render scale, aggressive foveated rendering, or a GPU that can’t keep up may make the image look soft even with clean lenses. On standalone headsets, battery mode and thermal limits can also reduce clarity in some situations.
Self-check checklist (2 minutes, no tools)
If you’re trying to figure out how to fix blurry vr lens quickly, run this checklist in order. Stop once the blur is gone.
- Lighting check: In a bright room, look at the lenses from an angle. Do you see streaks, cloudy patches, or fine scratches?
- Fog check: Put the headset on for 60 seconds. Does clarity change as it warms up, or does it get worse?
- Fit check: While wearing it, gently move the headset up/down and closer/farther. Does it “snap” into clarity at any position?
- IPD check: Adjust IPD through its range while looking at small text. Is there a clear best point?
- One-eye check: Close one eye at a time. Is one side consistently blurrier?
- App check: Try the home environment and one other app. Same blur everywhere, or app-specific?
If the headset only looks blurry during fast motion or heavy scenes, you may be seeing performance artifacts rather than lens blur.
Step-by-step fixes that work for most headsets
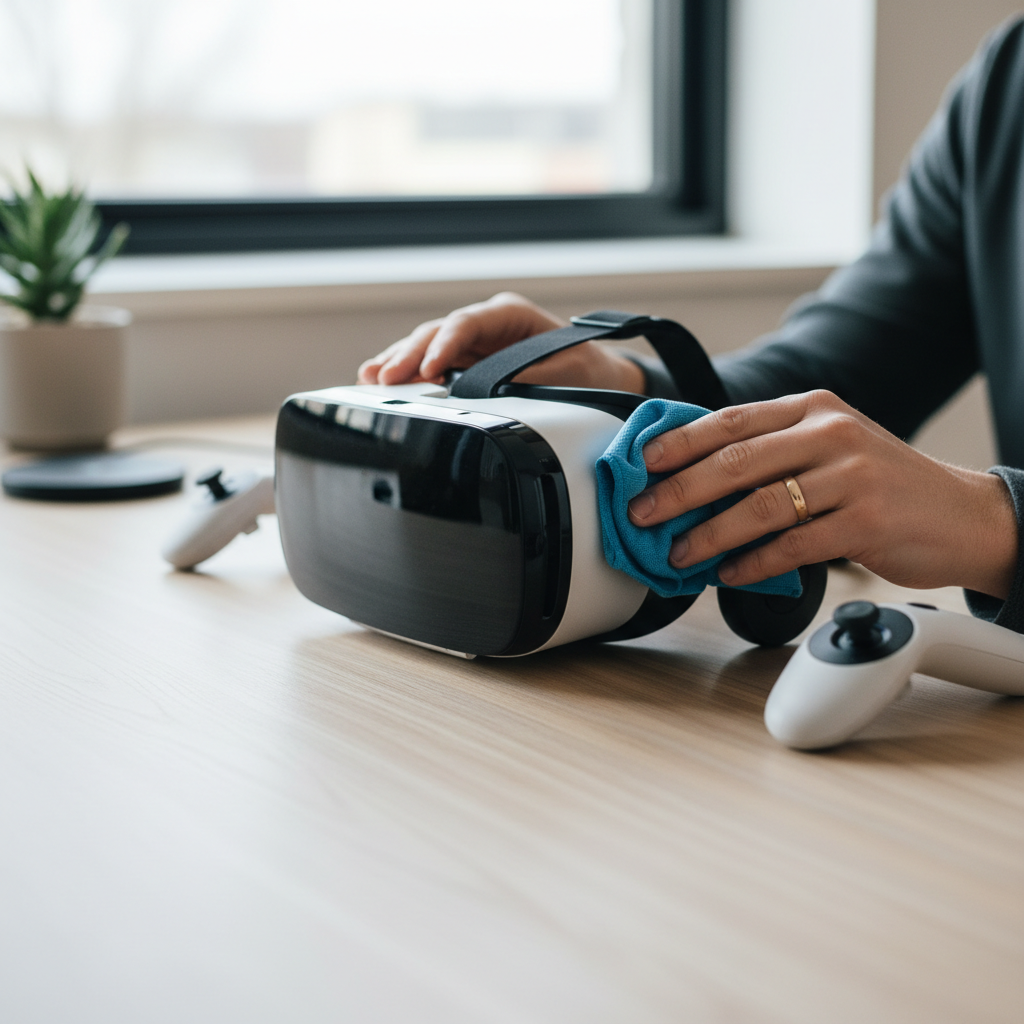
Clean the lenses correctly (this solves more than people expect)
Use a clean microfiber cloth meant for lenses. If you need moisture, use a tiny amount of lens-safe cleaner on the cloth, not directly on the lens, and avoid anything with harsh solvents.
- Do: wipe gently in small circles, then finish with a light pass to remove streaks.
- Don’t: use paper towels, tissues, alcohol wipes (unless your manufacturer explicitly allows it), or spray cleaner onto the headset.
- Check: make sure any shipping film or protective plastic is removed if your model shipped with one.
According to American Academy of Ophthalmology, cleaning lenses with appropriate microfiber materials helps avoid scratching and residue buildup, a good baseline rule for headset optics too.
Fix fogging without “hacking” the headset
If fogging is the issue, the goal is to reduce condensation, not just wipe it away mid-session.
- Let the headset acclimate in the room you’ll use, especially if it came from a cold car or porch.
- Loosen the seal slightly for airflow, then tighten once the lens warms up.
- Consider a facial interface that breathes better, or a gentle fan in the room.
Anti-fog products can help, but compatibility varies by lens coatings. If you go that route, test on a tiny edge first and follow the headset maker’s guidance.
Get back into the “sweet spot” (fit beats guesswork)
When users ask how to fix blurry vr lens, the most overlooked step is simply placing the headset correctly. Many people wear it like a hat and never land in the optics’ sweet spot.
- Start with the headset slightly higher than you think, then roll it down until text looks crisp.
- Tighten the top strap to carry weight, then side straps to stabilize.
- If your headset has an eye relief setting, bring lenses closer until eyelashes almost touch, then back off slightly.
If you wear glasses, try the glasses spacer (if included) and see whether clarity improves or worsens. Sometimes the spacer pushes you too far away and makes edges softer.
Dial in IPD (and don’t “split the difference” too casually)
If your headset supports IPD adjustment, take 30 seconds to do it intentionally.
- Look at small, high-contrast text.
- Move IPD slowly until both eyes feel equally relaxed and the text sharpens.
- If the headset uses software IPD (not physical lens movement), combine it with fit changes for best results.
If you know your IPD from an eye exam, use it as a starting point, but still fine-tune by feel since headset geometry and face shape vary.
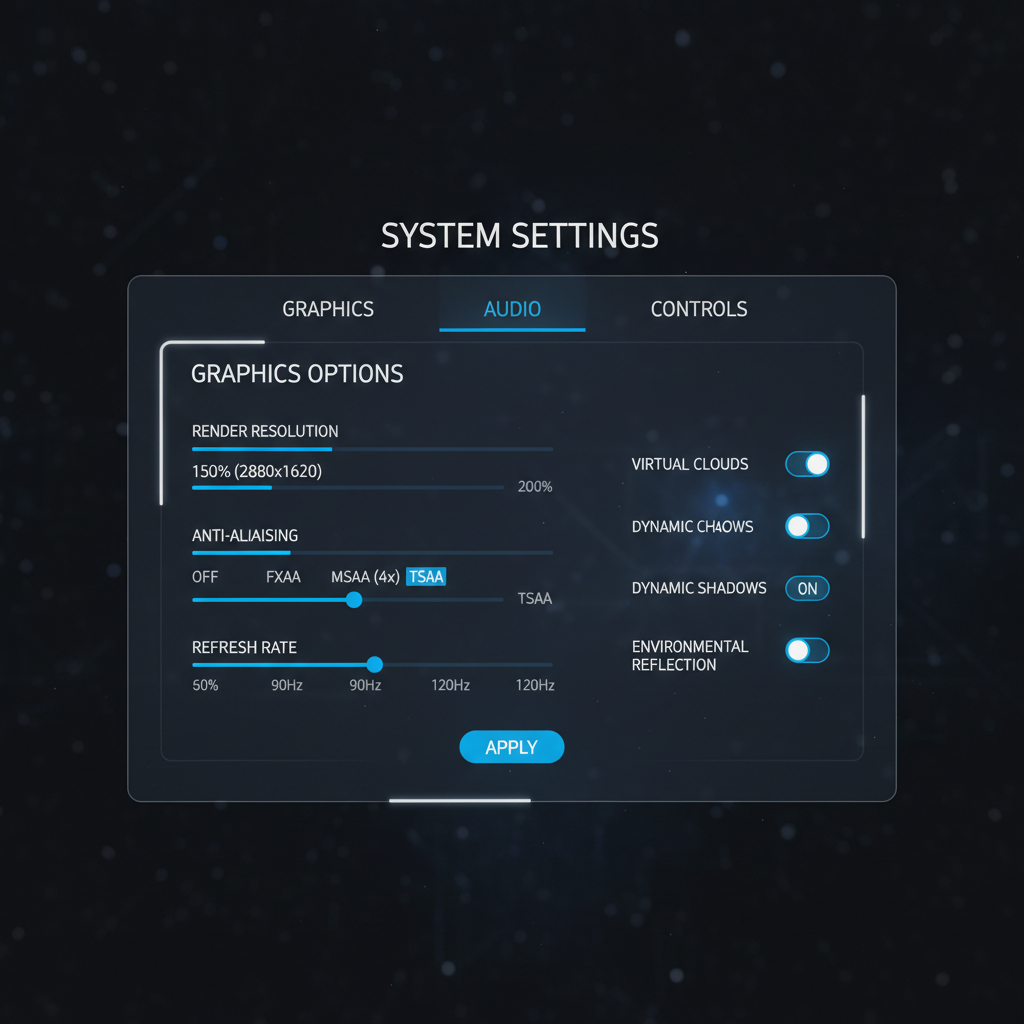
If it’s still blurry: software and performance settings to check
When lenses are clean and fit is right, remaining blur often comes from rendering quality. This is where people accidentally chase the wrong knob.
Standalone headsets
- Check if the app has a “graphics” or “resolution” option.
- Restart the headset to clear glitches that can drop resolution.
- Make sure the lens profile or “comfort” options are not forcing heavy foveated rendering.
PC VR (SteamVR or vendor software)
- Verify render scale / resolution per eye is not set too low.
- Check GPU driver updates if blur started after an update or a new game.
- Watch for reprojection or motion smoothing artifacts that can look like softness.
According to NVIDIA, keeping graphics drivers updated can improve stability and compatibility in games, which sometimes affects perceived clarity when pipelines change.
Common fixes, matched to symptoms (quick table)
If you want a fast path, match what you see to what you do next.
| What you notice | Most likely cause | What to try first |
|---|---|---|
| Smears, streaks, “greasy” look | Dirty lens or residue | Microfiber clean, dry finish pass |
| Haze that comes and goes | Fogging / condensation | Warm-up headset, improve airflow |
| Sharp only when you hold headset | Fit / strap tension | Re-seat, tighten top strap, adjust eye relief |
| One eye blurry | IPD mismatch or crooked fit | Adjust IPD, re-center headset |
| Everything “low-res” in one game | App settings or performance | Raise render scale, check refresh rate |
| Persistent haze + glare halos | Scratches or coating damage | Inspect under light, contact support |
Key points people miss (and end up making it worse)
- Avoid harsh cleaners: some coatings can cloud or streak permanently.
- Don’t “polish out” scratches: abrasive compounds can widen damage and reduce clarity further.
- Don’t overtighten: pressure changes face shape and shifts the sweet spot, plus it increases discomfort.
- Edge blur is not always a defect: many lenses look sharpest near center; your job is to align your eyes there.
- Glasses can be the hidden cause: lens-to-lens contact can scratch VR lenses, and the spacer can reduce FOV and clarity.
If you suspect scratched lenses, stop “testing” with aggressive wiping. Inspect gently and move to the support decision step below.
When it’s time to seek help (or replace parts)
If you’ve tried cleaning, anti-fog basics, fit, and IPD, and the blur remains consistent across apps, you may be dealing with hardware issues.
- Visible scratches or coating damage: often shows as permanent haze or starburst glare.
- Internal dust or haze: particles behind the lens are not user-serviceable on many models.
- Sudden drop in clarity after impact: lens alignment can shift; support can advise next steps.
- Persistent eye strain or headaches: could be IPD mismatch, vision changes, or comfort settings; consider an eye care professional if symptoms continue.
Use your headset manufacturer’s support channel if the device is under warranty, and describe what you tested. Clear, simple notes like “one eye blurry in home screen and two apps” speed up troubleshooting.
Practical wrap-up: what to do next
If you’re still wondering how to fix blurry vr lens, start with the boring stuff: clean correctly, warm up to prevent fog, then spend one focused minute on fit and IPD. Those steps solve the majority of “my headset is blurry” complaints.
Your next action: run the 2-minute checklist, then lock in one change at a time so you know what actually helped. If blur stays constant across apps and you can see physical damage under light, stop experimenting and move to manufacturer support.
FAQ
- Why is my VR headset blurry even after cleaning the lenses?
Usually it’s fit, IPD, or eye relief. Clean lenses help, but if your eyes sit outside the sweet spot, text still looks soft even with perfect optics. - How do I know if it’s fogging or a smudge?
Fogging tends to change over a minute or two as the headset warms up, while smudges stay consistent and look like streaks when you tilt the headset toward light. - Is edge blur normal in VR?
Often, yes. Many consumer VR lenses are sharpest in the center, so the goal becomes aligning the headset so your eyes naturally look through that center area. - Can I use glasses cleaner or alcohol wipes on VR lenses?
Sometimes it’s fine, sometimes it damages coatings, and policies vary by brand. Check your manufacturer guidance first, and when in doubt stick to a dry microfiber cloth and lens-safe cleaner used sparingly. - Why is one eye blurry in VR?
Common causes include IPD set wrong, the headset sitting slightly rotated, or a scratch on one lens. Try closing each eye to confirm, then re-seat the headset and adjust IPD slowly. - Does higher resolution in settings always fix blurry VR?
Not always. If the lens sweet spot is off, more pixels won’t help. But if the blur is app-specific or performance-related, increasing render scale (within GPU limits) can make a real difference. - What if my VR lenses are scratched?
Minor micro-scratches can reduce contrast and create glare, and “polishing” often makes it worse. If scratches are obvious and you’re under warranty, contacting support is usually the safer move.
If you’re trying to reduce blur but keep bouncing between settings and fit tweaks, it may help to follow a simple troubleshooting flow and track what changed, if you prefer a more hands-off option, many headset makers and retailers can guide you through model-specific fit pieces, lens inserts, or warranty checks without guesswork.